Author: admin

  • Homemade Lunchable Recipe

    Homemade Lunchable Recipe

    Meal Prep Lunch - adult lunchable

    Need something quick, easy, and healthy to grab on your way out the door?

    Meet the Homemade Lunchable, your new favorite no-stress lunch.

    It’s nostalgic, totally customizable, and perfect for meal prep. Even better? You can make most of it without turning on the stove. These little bento-style lunches keep well in the fridge for days, give you real variety, and somehow make lunch feel fun again.

    Kids love them. Adults rely on them.

    What You’ll Need for Homemade Lunchables

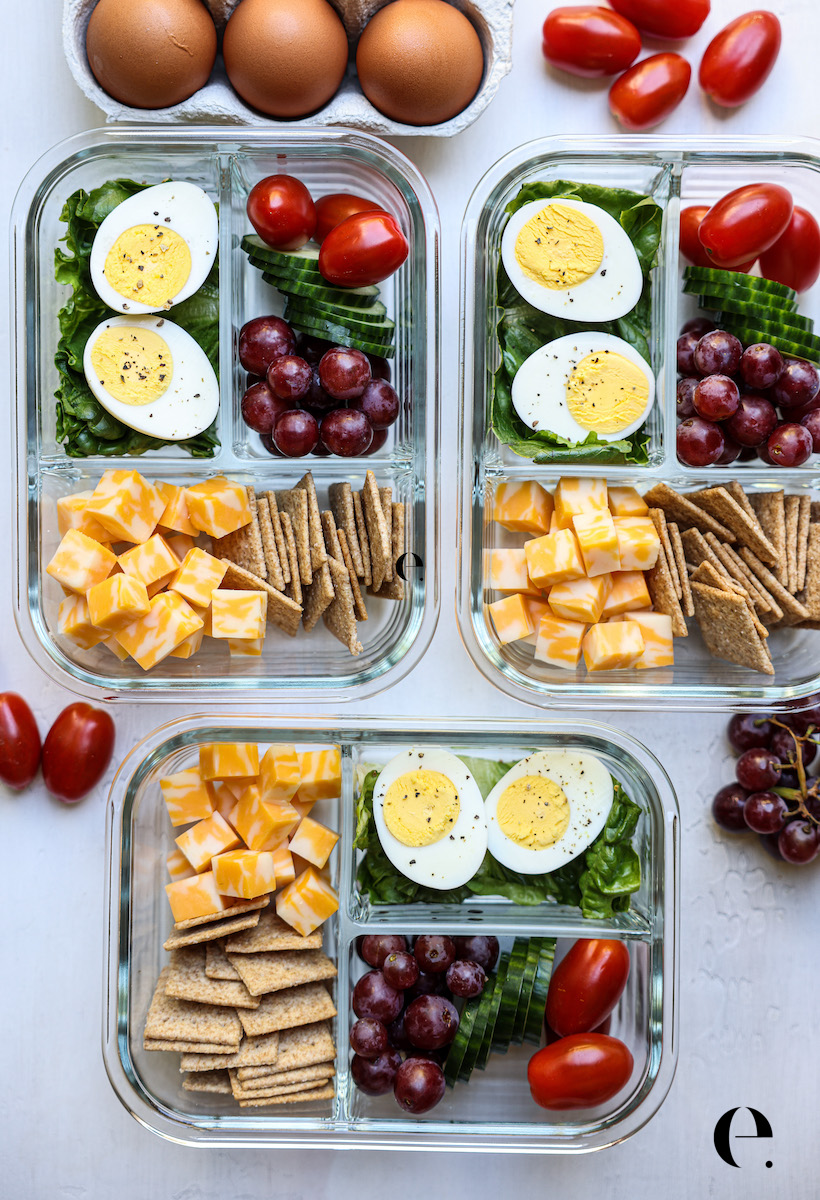
    To build a balanced lunchable, aim for:

    • 1 protein (turkey, chicken, hard-boiled eggs, high-protein cheese, tofu, etc.)
    • 2–3 fruits and vegetables
    • 1 starch or crunchy item (crackers, mini-breads, chips, carrots, etc.)
    • 1 small treat or healthy fat

    Here are some easy ingredient ideas to get you started.

    For fruits and vegetables, go big on fresh, colorful options:

    • Grapes
    • Cherry tomatoes
    • Baby carrots
    • Cucumber slices
    • Bell pepper strips
    • Apple slices or berries

    For proteins, choose something satisfying that holds up well in the fridge:

    For cheese, simple slices or cubes work best:

    • Low-fat (part-skim) mozzarella is high in protein
    • Cheddar
    • Swiss
    • Pepper jack

    For something crunchy or starchy, pick one you actually look forward to eating:

    • Crackers
    • Rice cakes
    • Pretzels
    • Roasted chickpeas or white beans

    For dips, fats, and a little something sweet, add one or two extras:

    • Hummus or guacamole
    • Nuts or trail mix
    • A square or two of dark chocolate
    Meal Prep Lunch - homemade lunchable

    Lunchable Containers

    You’ll want containers that keep everything neat and easy to grab. Use divided bento-style boxes or small reusable containers with tight-fitting lids. Glass divided containers are especially great because they keep food fresh and don’t hold onto odors.

    I bought these divided glass containers on Amazon, and these would be a good option, too.

    .Want more ideas? Check out these 34+ ideas for healthy meal prep.

    How to Assemble

    Putting these together is fast and flexible:

    • Add your protein to one section.
    • Add cheese to another.
    • Fill the remaining spaces with fruits, veggies, crackers or beans, dips, nuts, and a small treat.

    That’s it. No cooking required unless you want to hard-boil eggs or roast chickpeas.

    Why You’ll Love This Homemade Lunchables Recipe

    Here’s what makes Homemade Lunchables such a game-changer:

    • Zero decision fatigue at lunchtime
    • Totally flexible — use what you already have
    • An easy way to eat more fruits and vegetables
    • Feels like a treat instead of another boring desk lunch

    Once you start making these, you’ll wonder why you ever settled for anything else.

    Storage

    Once assembled, these lunchables stay fresh in the fridge for:

    • 3 to 4 days when stored properly

    Grab one as you head out the door, and lunch is done.

    The post Homemade Lunchable Recipe appeared first on Elizabeth Rider – Modern Healthy Living.

  • Simple Avocado Cucumber Salad Recipe

    Simple Avocado Cucumber Salad Recipe

    Simple avocado salad with cucumber, lime, and fresh cilantro in a bowl

    This simple avocado salad is fresh, creamy, and full of bright lime flavor.

    It comes together in minutes with just a few real-food ingredients, making it the perfect side dish for busy weeknights, summer dinners, or anytime you want something light but satisfying. It’s full of fiber and great flavor, too.

    It’s also flexible; you can substitute the lime for lemon or swap out the cilantro for parsley or another green if you don’t like cilantro.

    If you’ve ever needed a fast, healthy dish that feels special without being fussy, this is the one. Crunchy cucumber, creamy avocado, fresh herbs, and a lightly sweet lime dressing make this salad refreshing, nourishing, and endlessly versatile.

    Why You’ll Love This Avocado Salad

    • Ready in 5 minutes
    • Made with simple, whole ingredients
    • Naturally gluten-free and dairy-free
    • Refreshing, hydrating, and light
    • Easy to customize with what you have on hand

    Ingredients

    • 1 English cucumber, diced
    • 1 large avocado, peeled and diced
    • 1/4 cup fresh cilantro, chopped (or parsley, if preferred)
    • 1–2 tablespoons fresh lime juice (from 1 lime)
    • 2 teaspoons honey (omit, if preferred)
    • 1/2 teaspoon fine sea salt or kosher salt
    Chopped cucumber and avocado salad with cilantro and lime

    How to Make Simple Avocado Salad

    1. Add the diced cucumber, diced avocado, and chopped cilantro to a medium bowl.
    2. Drizzle the lime juice and honey over the salad, then sprinkle with the salt.
    3. Gently toss to coat. Taste and adjust with more lime or salt as needed.
    4. Serve immediately.

    Tip: Toss gently so the avocado stays in chunks instead of turning into a mash.

    What to Serve with Avocado Salad

    This salad pairs beautifully with:

    • Grilled chicken or shrimp
    • Tacos or fajitas
    • Baked salmon or white fish
    • Rice bowls or quinoa bowls
    • As a fresh topping for toast or inside wraps

    Easy Variations

    • Spicy: Add a pinch of red pepper flakes or diced jalapeño
    • Extra crunch: Add thinly sliced red onion
    • More protein: Toss in chickpeas, grilled chicken, or shrimp
    • Richer flavor: Drizzle with a little extra-virgin olive oil
    • Find more cucumber salad recipes here

    Storage Tips

    This avocado salad is best enjoyed fresh. If you have leftovers, store them in an airtight container in the fridge for up to 24 hours. Press a piece of parchment or plastic wrap directly onto the surface to help prevent the avocado from browning.

    Simple, Fresh, and Always a Hit

    This Simple Avocado Salad Recipe proves that healthy food doesn’t have to be complicated. It’s light, flavorful, and comes together fast—exactly the kind of recipe you’ll keep in your weekly rotation.

    If you try this recipe, leave a comment and let me know how you served it!

    Close-up of simple avocado salad with creamy avocado and crisp cucumber

    The post Simple Avocado Cucumber Salad Recipe appeared first on Elizabeth Rider – Modern Healthy Living.

  • Spinach Frittata (Easy, Healthy & Protein-Packed)

    Spinach Frittata (Easy, Healthy & Protein-Packed)

    Spinach Frittata

    This Spinach Frittata Recipe is one of those simple, reliable recipes you can make for breakfast, brunch, or an easy dinner.

    It’s packed with protein, loaded with greens, and finished with feta and fresh herbs for a savory, satisfying bite. It’s the kind of recipe that feels special but still fits into real life.

    And to be honest, out of my 12 ways to cook eggs, a frittata is absolutely one of my favorites.

    If you’re trying to eat more eggs without getting bored, a frittata is one of the easiest ways to do it. It’s flexible, fast, and a great way to use what you already have in the fridge.

    Why You’ll Love This Oven Frittata Recipe

    • High in protein without feeling heavy
    • Naturally gluten-free
    • Keeps well for easy meal prep
    • Easy to customize with what you have
    • Just as good for breakfast or brunch as it is for dinner

    What Is a Frittata?

    A frittata is like a crustless quiche. The fillings are mixed directly into the eggs and cooked partly on the stovetop, then finished in the oven. Here’s the difference between a frittata and similar egg dishes:

    • Omelet: fillings are folded into cooked eggs
    • Frittata: fillings are mixed into the eggs before cooking
    • Quiche: similar to a frittata, but baked in a crust

    Key Ingredients

    • Eggs: The star of a frittata! The protein-rich base that holds everything together.
    • Spinach: Adds vitamins, minerals, and a pop of color. Fresh or thawed frozen both work. If using frozen spinach, squeeze out the excess moisture.
    • Onion & Garlic: Build the flavor base.
    • Feta Cheese: Adds a salty, creamy bite. Goat cheese also works. Omit for dairy-free.
    • Fresh Herbs: Chives and dill add brightness and depth.
    spinach frittata recipe

    How to Make a Spinach Frittata

    • Preheat oven to 350°F (175°C).
    • Heat olive oil in a 10-inch oven-safe skillet over medium-high heat. Add onion and garlic and cook 4–5 minutes until softened. Add spinach and cook until wilted.
    • In a bowl, whisk eggs, milk, herbs, salt, and pepper. Pour into the skillet, gently stir, and sprinkle cheese on top.
    • Cook on the stovetop until the edges begin to set, about 5–7 minutes.
    • Transfer to the oven and bake 15–18 minutes, until set and lightly golden. A toothpick inserted in the center should come out clean.

    Easy Frittata Add-Ins

    • Mushrooms
    • Asparagus
    • Sun-dried tomatoes
    • Fresh tomatoes
    • Artichoke hearts
    • Red pepper
    • Parsley or scallions

    What to Serve with Frittata

    • Mixed green salad with balsamic dressing
    • Roasted potatoes or home fries
    • Toast, bagel, or English muffin
    spinach frittata recipe

    Pan Tips

    Use an oven-safe skillet, like cast iron or stainless steel. If you don’t have one, transfer everything to a greased baking dish and bake 5–10 minutes longer.

    Recipe Notes

    • To make this recipe dairy-free, use a non-dairy milk and skip the cheese.
    • Store leftovers in the fridge for up to 3 days.
    • This frittata tastes great warm or at room temperature. 

    The post Spinach Frittata (Easy, Healthy & Protein-Packed) appeared first on Elizabeth Rider – Modern Healthy Living.

  • Single-Serve Lightened-Up Egg Salad

    Single-Serve Lightened-Up Egg Salad

    When I’m craving egg salad and have a few hard-boiled eggs, this is how I make a lighter version of egg salad that hits the spot without the sometimes “gut bomb” feeling that comes with traditional egg salad.

    This is perfect for anyone looking for a nutritious and delicious option because it’s simple yet packed with flavor.

    I almost always use the wire rack now for making egg salad (watch the video on this page!) — it makes the entire process so much easier, and you can just put the wire rack in the dishwasher for easy cleanup.

    If you want to make a bigger batch of egg salad, check out my classic egg salad recipe with tips here.

    How to Make Single-Serve Egg Salad

    • 1 teaspoon Vegenaise or mayo
    • 1 teaspoon Greek yogurt
    • 1 teaspoon lemon juice (or water or pickle juice)
    • Salt and pepper to taste
    • 1 teaspoon fresh dill (or any herb)
    • 1 teaspoon minced red onion (or any onion)
    • 1 tablespoon minced celery
    • 3 hard-boiled eggs, peeled (this also works with 2 hard-boiled eggs; I like 3 for the extra protein)
    1. Make the hard-boiled eggs if needed. Bring water to a boil, then reduce to a bare simmer. Lower in the eggs. Keep the heat on very low (don’t let it boil or the eggs might crack). Set a timer for 13 minutes. After 13 minutes, shock them in an ice bath for 10 minutes to cool them (this also ensures the shells come off easily as the cold shock separates the shell membrane from the egg). See full tutorial here if needed. 
    2. Prepare the Dressing: Mix 1 teaspoon of Vegenaise (or mayo), 1 teaspoon of Greek yogurt, and 1 teaspoon of lemon juice (or water or pickle juice) in a small bowl. Season with salt and pepper, then add 1 teaspoon of fresh dill (or any herb), 1 teaspoon of minced red onion (or any onion), and 1 tablespoon of minced celery. Stir well.
    3. Prepare the Eggs: Peel 3 hard-boiled eggs and either push them through a wire rack into a bowl or chop them finely.
    4. Combine and Serve: Add the eggs to the bowl with the dressing and gently mix until evenly coated. Adjust seasoning if needed.

    Serve on whole-grain toast, in a sandwich, or on a bed of greens.

    The post Single-Serve Lightened-Up Egg Salad appeared first on Elizabeth Rider – Modern Healthy Living.

  • Bread Pudding

    Bread Pudding

    Believe it or not but bread pudding was one of the very first recipes I taught myself to make when I first got interested in cooking just after college. I LOVE bread pudding. The flavors are simple and remind me of french toast. The texture is dense and spongy, almost creamy. It’s a simple dessert that manages to feel both special and rustic. Also, it’s a delicious way to use up old bread!

    While bread pudding has it’s roots from England (and that’s where I first had it) to me it feels like a dish that could have easily been created in the southern US. It feels like country cooking and reminds me of it’s savory cousin, Stuffing, a Thanksgiving staple.

    Related: If you love this next try our French Toast Casserole.

    Ingredients

    • Bread – stale bread is best, see notes
    • Unsalted butter
    • Eggs
    • Milk
    • Granulated white sugar
    • Vanilla extract
    • Cinnamon

    How to make Bread Pudding

    Tear up the bread into small pieces. Butter or lightly grease your baking dish and add the bread pieces to it.

    Melt the butter. Drizzle half the melted butter over the bread pieces.

    In a medium sized mixing bowl add the eggs, milk, sugar, vanilla and cinnamon. Whisk until well combined, you really want to break up the eggs so the yolks and whites are well combined. Then stir in the butter (hopefully slightly cooled by now).

    Pour the egg batter over the bread pieces. Lightly press the bread down so all the pieces get soaked, it will spring back some and that’s fine.

    Bake at 350°F for 40-45 minutes. The bread pudding will puff up toward the end of baking. Once removed from the oven it will settle back down. Cool for 10-12 minutes before slicing into it.

    Notes

    • You can use any type of bread for this but I love sourdough. Sandwich bread, hot dog buns, dinner rolls, etc. will all work though.
    • You do want the bread stale, this allows it to soak up the egg batter well and that’s what makes the final dish so spongy and delicious. If your bread is not stale then toast in your toaster, air fryer or oven for a few minutes.
    • Use part brown sugar (up to half) to add more flavor.
    • Add raisins for classic old fashioned bread pudding.
    • Add a bread pudding glaze – not really necessary but traditional and easy. Whisk together powdered sugar with a little vanilla extract and just enough milk to make a pourable glaze. Alternative idea- sprinkle the bake with powdered sugar.

    More Homemade Desserts

    Print

    Bread Pudding

    A spongy and creamy baked bread pudding recipe
    Course Dessert
    Cuisine English
    Keyword bread pudding
    Prep Time 10 minutes
    Cook Time 40 minutes
    Total Time 50 minutes
    Servings 9
    Calories 216kcal

    Ingredients

    • 6 slices bread
    • ¼ cup butter
    • 4 eggs
    • 2 cups milk
    • cup granulated white sugar
    • 1 teaspoon vanilla extract
    • 1 teaspoon cinnamon

    Instructions

    • Tear up the bread into small pieces.
    • Butter or lightly grease your baking dish and add the bread pieces to it.
    • Melt the butter. Drizzle half the melted butter over the bread pieces.
    • In a medium sized mixing bowl add the eggs, milk, sugar, vanilla and cinnamon. Whisk until well combined, you really want to break up the eggs so the yolks and whites are well combined.
    • Then stir in the butter (hopefully slightly cooled by now).
    • Pour the egg batter over the bread pieces. Lightly press the bread down so all the pieces get soaked, it will spring back some and that’s fine.
    • Bake at 350°F for 40-45 minutes. The bread pudding will puff up toward the end of baking. Once removed from the oven it will settle back down.
    • Cool for 10-12 minutes before slicing into it.

    Notes

    • You can use any type of bread for this but I love sourdough. Sandwich bread, hot dog buns, dinner rolls, etc. will all work though.
    • You do want the bread stale, this allows it to soak up the egg batter well and that’s what makes the final dish so spongy and delicious. If your bread is not stale then toast in your toaster, air fryer or oven for a few minutes.
    • Use part brown sugar (up to half) to add more flavor.
    • Add raisins for classic old fashioned bread pudding.
    • Add a bread pudding glaze – not really necessary but traditional and easy. Whisk together powdered sugar with a little vanilla extract and just enough milk to make a pourable glaze. Alternative idea- sprinkle the bake with powdered sugar.

    Nutrition

    Calories: 216kcal | Carbohydrates: 27g | Protein: 6g | Fat: 10g | Saturated Fat: 5g | Polyunsaturated Fat: 1g | Monounsaturated Fat: 3g | Trans Fat: 0.2g | Cholesterol: 93mg | Sodium: 177mg | Potassium: 138mg | Fiber: 1g | Sugar: 19g | Vitamin A: 352IU | Vitamin C: 0.05mg | Calcium: 105mg | Iron: 1mg